Go to the Lincoln Mold Company home page.
Browse through pictures of our molds and patterns.
Browse through the many fine products in our store!
Be the first to learn about special discounts, new products and how-to information.
Find out what the media is saying about Betty Bailey and her dolls!
Read about our shipping options.
Send us a message, or give us a call!  We'd love to hear from you.
Your privacy is very important to us.  Read our policy statement!
We use a secure server so that your personal information is kept from prying eyes.
Here's what our customers are say about our molds and patterns...
Here are a few of our favorite doll websites.
 

Click here to use more advanced search features.

 
Lincoln Mold Company - Exclusive Distributor of the Betty Bailey Originals Molds


Issue 19 - October 1, 2005

Back to newsletter archive

Lincoln Mold Newsletter
Issue 18 - August 26, 2005
http://lincoln-mold.com

Colorado Doll & Bear Extravaganza 2005

Join us at the Holiday Inn, I-70 and Chambers Road in Denver, Colorado October 8-9th, 2005! We will have new molds and patterns and some of our our old ones. We are looking forward to seeing you all there.

WIGS FOR 19th CENTURY FASHION PLATE COLLECTION

A Three Part Series

Part 2
MAKING THE WIG

First the wig cap should be covered with a layer of mohair. Make this covering by laying parallel strands of loose mohair flat and even on the sewing machine table. Lay a section to measure 4 ½ inches. The thickness of this layer should not be very thick. It only needs to be thick enough to barely cover the wig cap so that it does not show through when the wig is finished. After it has been laid out, slide it over to the machine presser foot and zigzag a row of stitches right down the center to anchor the section. This row of stitching will become a center part from back to front when it is glued onto the wig cap.


The Back of the Wig Cap

Spread a thin coat of white glue on the outside of the wig cap and place the stitched mohair over it with the center zigzag line placed along the center of the wig cap as in a center part. Press the mohair onto the wig cap all around. This layer should just barely hide the wig cap but not a finished wig.

Trim the mohair all along the edge of the wig cap. It will just look like a bad hair cut but this will not show in the finished wig.

Trim the mohair all along the edge of the wig cap. It will just look like a bad hair cut but this will not show in the finished wig.

ADDING THE HAIR
Beginning with this next step the directions will be toward a hair style that will be pulled up off the neck and arrange on top or back of the head.


continued..

You will need strips of mohair stitched together on the top end. This wefts of mohair will remind you of a grass skirt.

The Wefts of mohair will be glued inside the Wig Cap and hang downward at this point.

There is a right and wrong side to the wefts. The under side has short hairs where the weft was turned under and sewn into a weft. The top side has long smooth continuous hairs. Use short sections of the mohair wefting. Shorter sections will be easier to handle than on long piece that extends the circumference of the head.

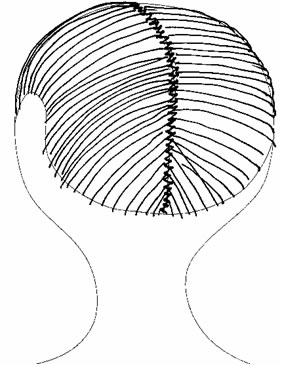
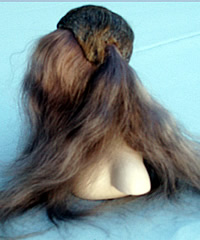
Lay the wefts on paper with the smooth top side of the weft facing downward. Using a white glue dispensing bottle run a thin bead of glue on the weft header where it is sewn. Begin just above the hair line and glue the wefts inside the wig cap making sure that the top smooth side of the mohair is facing inward. After circling the wig cap let it dry a few minutes before gluing the second strip of wefting. Glue the next weft row just above the first. Do the same with a third weft. The number of the weft glued on is determined by how thick and full the strips of mohair are. A forth weft may or may not be needed.

There must be just enough hair in the wig cap so that the hair will cover the wig cap properly when pulled up and tied off. If there is more hair than needed, the finished product will appear wiggy.

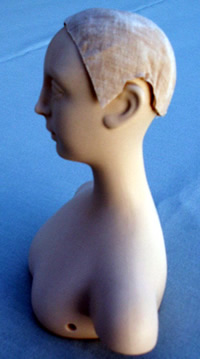
A gentle glue should be used to adhere the wig to the dolls head. Spread glue inside the wig cap above the mohair and place it on the head. Adjust the cap properly. Feel to adjust the wig cap. If it is not placed on the head right then the hair will seem crooked when it is dry. The 
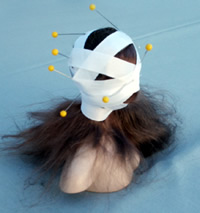
edge of the cap should follow the hair line. Wrap the cap onto the head with a strong fabric twill tape or ribbon. Wrap the tape around and around in different directions very tightly and pin it on itself in a few places as you wrap. Pull the twill tape very tight to hold the wig cap in place while it dries. The cap and glue must make contact with the head in order be glued securely. Allow it to dry over night. Carefully remove the pins and tape. If the glue is dry the stiff wig cap will hold the hair line close to the porcelain when the hair is lifted up.

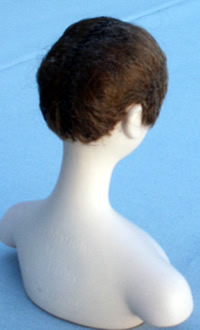
Pull the hair up and secure on top as the hair style needs. Make sure the pulled up hair is in the proper place over the wig cap. In order to make the wig appear more natural add extra small strands or curls of hair around the edges where it may have been missed. Put a small amount of glue on the top end of a curl and push the top ends under the wig cap where it should be.

Making sure the sides of the hair are smooth and natural the hair can be tied off on the top or back. This pony tail of hair can be either cut off or used in the hair style.

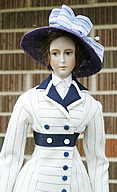
The wig is ready to be styled.

In our next newsletter we will finish the wig and give you suggestions on hair styles.

Coming next newsletter Part 3
STYLING THE WIG


Click here for more images of the new 17 inch Lady Marion.

Now available Lady Marion 17

Molds for our brand new Lady Marion 17 inch doll are now available. She has a porcelain head and upper body. that ends just below the bust. She has a shapely cloth body and full porcelain arms that can also be cut off just below the elbow for using half arms and a wire armature.Her legs are porcelain up to just above the knee. Her shoes were sculpted smooth except for the shoe soles. Her shoes may be painted on in any style

Lady Marion is wearing a 1912 Rose's Boarding Suit from Betty Bailey's New Fall Collection of Patterns "The Titanic Era Collection". Click here to see the entire collection.


Subscriptions


Thank you for subscribing to our newsletter, and for your interest in our patterns and molds.

If you don't want to receive any more of our newsletters, please click here to unsubscribe.


Lincoln Mold Company
2554 Mansfield Drive
Des Moines, Iowa 50317
http://lincoln-mold.com
voice: 515-266-6432
fax: 775-628-9185


Back to newsletter archive


Home  |  Gallery  |  Our Store  |  Newsletter  |  In the Media
Shipping  |  Contact Us  |  Privacy  |  Security  |  Testimonials  |  Links

Lincoln Mold Company
2554 Mansfield Drive, Ste 1
Des Moines, Iowa 50317
voice: 515-266-6432
fax: 775-628-9185

send us an email message

Copyright 2004 Lincoln Mold Company. All rights reserved


Website designed and Maintained by Dan & David Bailey